Installation
- The most important thing is to have the will, patience, and time to carefully follow the directions in the video.
Installation video
Preparation
Wiring
It will help to familiarize yourself with the intended Two-X wire routing. Here are some pictures of a well-done installation, with the wheel removed for a good view of all the wiring:


Be Careful
Have Fun
Think of it like building a new Lego kit. Except with a so-much-more-awesome result. Be mentally interested in taking on a challenge before you start, and enjoy the process. Once it's finished, and you go to step on it for the first time, pay attention to any differences in how it feels. Any sense of accomplishment you feel at this moment is fairly deserved :)
After Your Install
Directly after your install, you want to make sure the board is working as it should. Test it out, make sure it rides OK.
Before charging, understand the following warning:
Never plug an XR charger into a Two-X!! XR chargers have the same plug in a blue color. The blue plug is like kryptonite to a V1 or Plus, with or without Two-X.
If your board behaves weird in any way, you are advised to open your battery box back up and disconnect everything from the BMS, until you have a chance to diagnose it and debug it. Often this will mean the difference between a simple issue destroying the battery set or not.
If you want, you can do a deep rebalance. To do that, plug in the charger, and leave it plugged in (even though the light will turn green) for 24 to 48 hrs (the longer the better). You can watch the slow boring balancing progress using pOnewheel android app if you want.
There. Now go nuts and have fun.

Notes on Weatherproofing
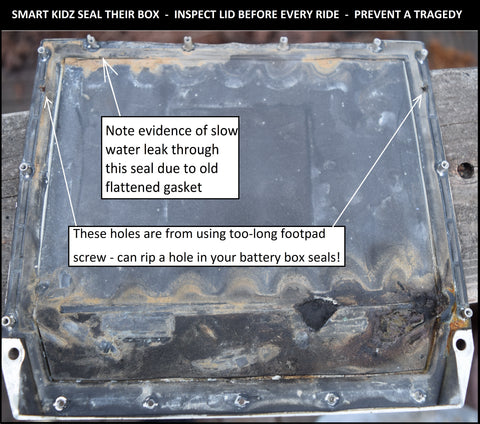
Here's where I use some scare tactics to help you ensure your board doesn't get ended by water leaks. When you are in there installing Two-X is the perfect time to re-seal your battery box. Regardless you will need to seal the passage through the gland where the Two-X wires pass through, but you should check all the stock seals as well because they tend to age and fail.
Here's what can happen when water gets in to the battery box. Don't let this be your BMS:

Look how an innocent quick dip through a stream can violently demolish a onewheel in minutes.
It turns out that the provisions for the onewheel battery-box water seal are not commensurate to the consequences of its failure.
(Yes, I am totally kidding about "Inspect lid before every ride". As if ;)
I advise everyone, before you ride thru a single puddle, to pull out your battery box and overhaul its seals carefully, to your own standards of weatherproofing. Whatever those standards are, they'll be better than what you're rocking now.
You can use any kind of RTV or silicone caulk, depending if an auto store or a hardware store is closer to you. Here is some different goop which is no joke: 3M 08008 ( http://a.co/d/e2DbfL8 ).
Here are some steps to seal the battery box:
- Ensure foam gasket on box top is squishy enough and seating correctly all the way around. Check its coloration for evidence of liquids or particulates.
- Keep Two-X wires from being stuck between lid & box sides, jamming seal.
- Check the sheet metal lid is flat, not bent too much between each screw and that the screws are tight, uniformly, to seal well.
- Add a bead of sealant around the LED window gasket
- Fill the gland passage with sealant to fill gaps between two-x wires.
- Check the gore-tex pressure vent is sealed all around and not tearing off.
As for water seals of the Two-X satellite packs ...
Although the satellite packs contain no active circuitry and no voltages higher than 13V, they are very hard to open, so if water gets in there it'll end up corroding stuff. Unless they get damaged, water can only get into them through their tops or around the wire entry point. Vibration can eventually cause the rubber sealant to fail after heavy use, so periodically you should check the seals and reseal them. Here's how:
First, identify suspect areas to add sealant:
- Unscrew the two housings from the board and flip em over in place. clean and inspect the top side. Specifically, the crack around the edge where the lid seals to the box. Note any areas where there may be openings which could be a way for liquid to get in. The perimeter of the top side could use goop.
- Same goes for the point where the wires enter the box.
- If your unit has tiny screws holding the lid on (they don't all), you may cover each of them with goop.
- If all of those places are sealed then the only remaining path for anything to get in is down the shrink tube where the wires are. This has been purposely left unsealed to provide a channel for air to equalize pressure changes.
- Now seal em up! : Squish the 3M sealant goop all down into any cracks with your fingertips. Eeeeew squishy!!
Yer all done.
Questions on installation? Email us: